Friday, September 26, 2014
Alfatel H1 Sim Way
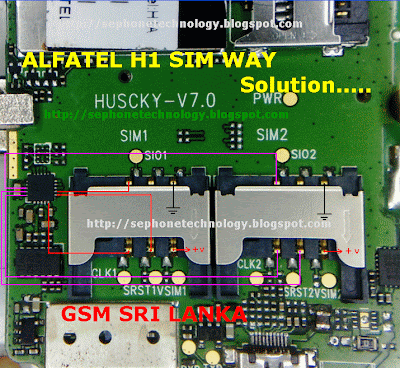
Alfatel H1 Sim Way Solution,
if you check it much give few comments about this so that others can learn form your comments also.
If you have any other Questions please do not hesitate to share with me.
Motorola Xyboard 8 2 with WIFI Factory data reset
| Motorola Xyboard 8.2 with WIFI Factory data reset |
Performing soft reset and factory data reset ( master reset or hard reset ) Motorola Xyboard 8.2 with WIFI via Settings menu and Hardware key :
Hard reset via Settings
- From the home Lcd, touch Apps
- Touch Settings
- Touch Privacy
- Touch Factory data reset
- Touch Reset tablet and follow the onLcd instructions
Hard reset via hardware / external keys
The steps below should only be used if you are unable to navigate through the menu to perform a standard factory data reset:
- Turn tablet off. You may need to use two hands in this process to press and hold buttons properly.
- Turn on the tablet with power button, wait a full 2 seconds from the time the tablet starts showing the red Motorola logo, then press and hold the down and up Volume key. (you should not hold down the power button after it turns on and logo appears)
- “Android Recovery” will appear on top of Lcd if timing is done correctly. Release volume button. (if you continue to press volume down at that message, the message will cycle through “RSD, Fastboot, and back to Android Recovery. Make sure message states Android Recovery before you go to next step). If stuck at a RSD protocol or Fast boot Lcd, reboot the tablet by holding power button then pressing the volume up).
- While Lcd states “Android Recovery“, Press volume up button, the Lcd will say “Entering Android recovery mode” and a few seconds later an Android robot graphic will appear alone on the Lcd. Release buttons.
- Hold down power button and then press the volume up key together to see the Android Recovery Lcd menu selections.
- Use the volume buttons to move up and down through selection in this menu.
- Using the volume down button, scroll down to “Wipe data/factory reset”
- Tap Power hard key to select option.
- Scroll down to select “Yes, delete all user data”.
- Tap the power button to select. Wiping and formatting data will take a few minutes.
- You will return back to the Android recovery Lcd menu.
Warning! All data will be erased from device memory, including system and application data, settings and downloaded applications. Back up your important data. The device will restore to factory settings.
Performing soft reset
If your device becomes unresponsive, frozen, hangs or freezes , try a forced reboot: Press and hold both Power/Lock button and the up-volume key for 10 seconds. Note: Data on your tablet will not be deleted.
Thursday, September 25, 2014
Free Samsung Tool 4 0 6beta1
 SUPPORTED MODELS:
Samsung D838, Samsung D830, Samsung D820, Samsung D808, Samsung D807, Samsung D800, Samsung D730, Samsung D720, Samsung D710, Samsung D600E,
Samsung D600Ecode, Samsung D600, Samsung D600 code, Samsung D550, Samsung D528, Samsung D520, Samsung D508, Samsung D500E, Samsung D500, Samsung D488,
Samsung D428, Samsung D418, Samsung D415, Samsung D410, Samsung D407, Samsung D400, Samsung D357, Samsung D347, Samsung D307, Samsung D108,
Samsung D100, Samsung E908, Samsung E906, Samsung E900, Samsung E890, Samsung E888, Samsung E880, Samsung E878, Samsung E870, Samsung E860V, Samsung E860,
Samsung E850, Samsung E848, Samsung E840, Samsung E828, Samsung E820, Samsung E810, Samsung E808, Samsung E800N, Samsung E800, Samsung E788, Samsung E786,
Samsung E780, Samsung E770, Samsung E760, Samsung E758, Samsung E750, Samsung E738, Samsung E730, Samsung E728, Samsung E720, Samsung E715, Samsung E710,
Samsung E708, Samsung E700, Samsung E650, Samsung E648, Samsung E640, Samsung E638, Samsung E635, Samsung E630, Samsung E620, Samsung E610, Samsung E608,
Samsung E600F, Samsung E600, Samsung E578, Samsung E570, Samsung E568, Samsung E560, Samsung E530, Samsung E498, Samsung E490, Samsung E470, Samsung E400,
Samsung E390, Samsung E380, Samsung E370, Samsung E368, Samsung E360, Samsung E356, Samsung E350E, Samsung E350Ecode, Samsung E350, Samsung E350 code,
Samsung E338, Samsung E335, Samsung E330N, Samsung E330, Samsung E320, Samsung E318, Samsung E317, Samsung E316, Samsung E315, Samsung E310, Samsung E308,
Samsung E305, Samsung E300F, Samsung E300, Samsung E250 New, Samsung E250V, Samsung E250, Samsung E236, Samsung E217, Samsung E210, Samsung E116,
Samsung E108, Samsung E105, Samsung E100, Samsung C520, Samsung C516, Samsung C510, Samsung C506, Samsung C450, Samsung C400, Samsung C308, Samsung C300,
Samsung C268, Samsung C266, Samsung C260, Samsung C250, Samsung C240, Samsung C238, Samsung C230, Samsung C225, Samsung C218, Samsung C216, Samsung C210,
Samsung C208, Samsung C207, Samsung C200N, Samsung C200, Samsung C180, Samsung C170, Samsung C140, Samsung C130, Samsung C128, Samsung C120, Samsung X900,
Samsung X840, Samsung X830, Samsung X828, Samsung X820, Samsung X818, Samsung X810, Samsung X808, Samsung X800, Samsung X770, Samsung X700, Samsung X688,
Samsung X680V, Samsung X680N, Samsung X680, Samsung X680 Old, Samsung X668, Samsung X660, Samsung X658, Samsung X656, Samsung X650, Samsung X648,
Samsung X640, Samsung X638, Samsung X636, Samsung X630, Samsung X628, Samsung X620, Samsung X610, Samsung X608, Samsung X600, Samsung X530, Samsung X520,
Samsung X518, Samsung X510, Samsung X508, Samsung X500, Samsung X497, Samsung X496, Samsung X495, Samsung X490, Samsung X486, Samsung X481, Samsung X480,
Samsung X478, Samsung X475, Samsung X468, Samsung X466, Samsung X461, Samsung X460, Samsung X458, Samsung X450, Samsung X438, Samsung X430, Samsung X427M,
Samsung X427, Samsung X426M, Samsung X426, Samsung X400, Samsung X308, Samsung X300, Samsung X218, Samsung X210, Samsung X208, Samsung X200, Samsung X168,
Samsung X166, Samsung X160B, Samsung X160, Samsung X156, Samsung X150, Samsung X140, Samsung X138, Samsung X130, Samsung X120, Samsung X108, Samsung X105,
Samsung X100, Samsung V208, Samsung V205, Samsung V200, Samsung V100, Samsung S730i, Samsung S720i, Samsung S508, Samsung S500, Samsung S500i, Samsung S401i,
Samsung S400i, Samsung S342i, Samsung S341i, Samsung S308, Samsung S300, Samsung S208, Samsung S200, Samsung S100, Samsung M600, Samsung M300, Samsung Q605,
Samsung Q400, Samsung Q300, Samsung Q200, Samsung Q100, Samsung P908, Samsung P900, Samsung P850, Samsung P777, Samsung P738, Samsung P735, Samsung P730,
Samsung P728, Samsung P720, Samsung P710, Samsung P705, Samsung P408, Samsung P400, Samsung P318, Samsung P310, Samsung P308, Samsung P300, Samsung P207,
Samsung P110, Samsung P100, Samsung T719, Samsung T649, Samsung T629, Samsung T619, Samsung T609, Samsung T539, Samsung T519, Samsung T419, Samsung Q605,
Samsung U608, Samsung U600, Samsung U308, Samsung U300, Samsung U108, Samsung U106, Samsung U100, Samsung J600, Samsung F520, Samsung F308, Samsung F300,
Samsung F210, Samsung F200, Samsung I730, Samsung I700, Samsung I505, Samsung I500, Samsung I320, Samsung I310, Samsung I308, Samsung I300X, Samsung I300,
Samsung Z105U, Samsung Z105T, Samsung Z105, Samsung Z107V, Samsung Z107M, Samsung Z107, Samsung Z110, Samsung Z130X, Samsung Z130, Samsung Z140,
Samsung Z140V, Samsung Z160, Samsung Z300M, Samsung Z300, Samsung Z400, Samsung Z500, Samsung Z500V, Samsung Z540, Samsung Z560, Samsung Z700,
Samsung ZM60, Samsung ZV10, Samsung ZV30, Samsung ZV40, Samsung ZV50, Samsung ZX10.
Download
http://rapidshare.com/files/170183796/F.S.T.4.06b_fixedgsm.blogspot.com.rar

How to Transfer Contacts from Sim Card or Memory Card to Sony Xperia Z2
How to transfer contacts from a SIM card to your device:
1. On your devices homeLcd, tap on the .
.
2. Then tap on the Person icon or Contacts.
3. Press the Three Vertical Dots, and select Import contacts > SIM card.
4. If you have set up a synchronization account, then you can choose to add the SIM card contacts under that account. Or you may choose to only use the contacts on your device.
5. If you want to import all the contacts, tap Import all.
6. If you want to select which contact to transfer, you just need to find and tap on the contact.
How to transfer contacts from a memory card to your device:
1. On your devices homeLcd, tap on the.
2. Then tap on the Person icon or Contacts.
3. Press the Three Vertical Dots, and select Import contacts > SD card.
4. Choose the option you preferred if you have set up a synchronization account. Whether to add the imported contacts under that account or on your device.
5. If you have more than one vCard file on the SD card, there should be a list appear on the different batches of contacts. Just select the batch you want to import.
1. On your devices homeLcd, tap on the
.2. Then tap on the Person icon or Contacts.
3. Press the Three Vertical Dots, and select Import contacts > SIM card.
4. If you have set up a synchronization account, then you can choose to add the SIM card contacts under that account. Or you may choose to only use the contacts on your device.
5. If you want to import all the contacts, tap Import all.
6. If you want to select which contact to transfer, you just need to find and tap on the contact.
How to transfer contacts from a memory card to your device:
1. On your devices homeLcd, tap on the
.2. Then tap on the Person icon or Contacts.
3. Press the Three Vertical Dots, and select Import contacts > SD card.
4. Choose the option you preferred if you have set up a synchronization account. Whether to add the imported contacts under that account or on your device.
5. If you have more than one vCard file on the SD card, there should be a list appear on the different batches of contacts. Just select the batch you want to import.
Wednesday, September 24, 2014
Samsung I9100 GalaxyS2 Usb Not Detected Solution


